Design and use of gas turbine wheel groove broach
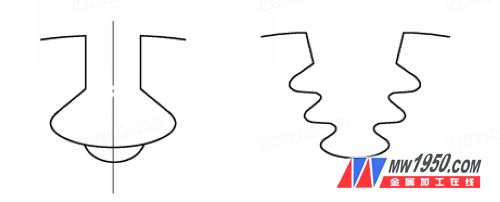
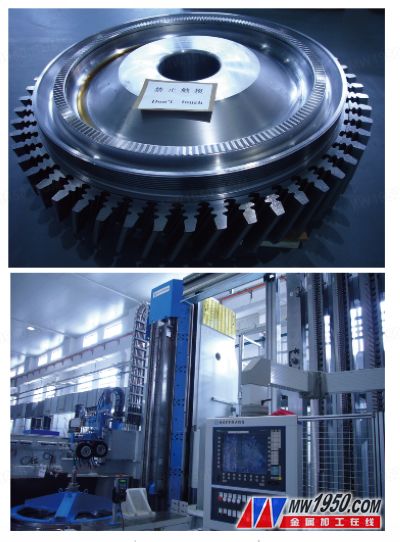
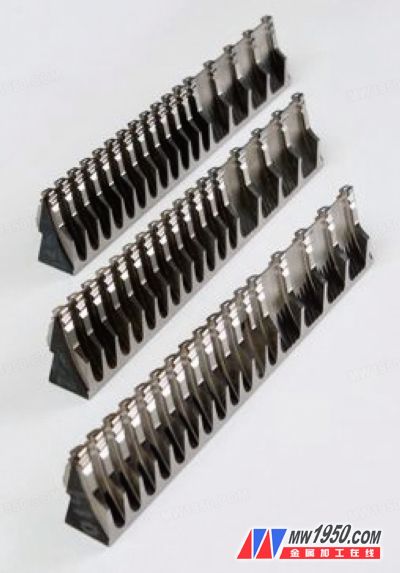
Gas turbines are one of the core equipment for gas-fired power generation equipment and power generation equipment such as ships, ships and submarines. The gas turbine wheel is divided into a compressor wheel and a rotor turbine wheel. The wheel groove type of the compressor wheel is a dovetail groove type, and the wheel groove type of the rotor turbine disk is a eucalyptus type. For example, a set of broach of Class F gas turbine includes 10 types of wires (including 6 types of compressor wheel groove groove type and 4 types of wheel groove type of rotor turbine wheel), as shown in Fig. 1 and Fig. 2. Both of these wheel slots are broached on a broaching machine by a slotted broach, which is the most complex of the flat forming broaches (see Figure 3). Whether it is the design technology and manufacturing technology of the wheel broach, or the technology and grinding technology of the wheel broach, it is a complete set of complicated technology different from other broaches; these technologies and the application of the broaching machine and the disc material Techniques such as broaching process are closely related. The following is a brief introduction to the relevant technologies in this regard. According to the technical requirements of the wheel groove type, the compressor wheel groove is simpler than the rotor turbine wheel groove. The following is mainly based on the rotor turbine wheel groove type line. Knife design. The rotor turbine wheel groove type line is divided into a working surface, a non-working surface and an arc. The contour of the working surface is 0.007mm, which includes the cumulative cumulative error of the work surface profile error, pitch error, tooth angle error, etc., which is 0.007mm. The non-working surface and arc profile are 0.07mm. For the technical requirements of the wheel groove, the broaching scheme of the wheel groove is determined, which includes: 1 overall broaching graphic design. 2 broaching allowance distribution design. 3 broach component design, divided into rough broach, semi-finish broach and fine broach. The division and function of each broaching tool are different. The roughing broach is to gradually and layerly remove a large amount of metal in the wheel groove, and the precision requirement is relatively low; the semi-finishing broach corrects the contour error of the rough drawing, and gradually forms the contour along the final groove. The balance of the fine broach is left to the balance; the final broaching of the fine broach is contoured. Generally speaking, the particularity and importance of the wheel groove determine the structural design idea of ​​the wheel groove broach. The rough broach and the semi-finish broach are designed as a progressive structure; the fine broach is designed as a grouped identical structure, that is, the same The broach is divided into several sets of cutting teeth, and the number of teeth of several teeth in each group is the same, except that each tooth broachs different contour segments (segment broaching). Since the unfolding length of the wheel groove type line is too long, if the entire type line is broached by one tooth at a time, the pulling force will be very large, and the power of the broaching machine may be large, and the energy consumption will be large. Uneconomical or no suitable broaching machine; the broach strength will not be able to withstand, causing the broach to collapse. The accuracy index of the groove broach is set as follows: 1 The contour accuracy is ±0.015mm. 2 working surface angle error ± 1 '. 3 The cumulative error of the working surface pitch is ±0.005mm. Before installing the broach, you must carefully check whether the edge of each broaching section is bumped or chipped; check the surface of the broaching broach for pulling or scratching. If it is, it must be handled before the broach can be installed. The locating surface of all the coarse, semi-finished and fine knives of the same type line and the locating surface of the broaching machine on the broaching machine must be carefully cleaned. When installing the broach, first place the broach in the constant temperature workshop for not less than 2h. After the temperature of the broaching and broaching machine and the wheel blank are basically the same, install the broach; otherwise, the broach after installation will be deformed. It must be carefully installed according to the sequence number of the broach and the installation position of the broach holder, and carefully checked, and the misalignment must not be installed. There must be a solid connection between the broaching section and the broaching clamp, and there must be no gap. The end face of the broaching section and the end face of the broaching section must be solid, and the gap should be as small as possible. Fastening the broach Each bolt or compression bolt must be secure. It is best to tighten with a torque wrench to ensure that the pressing force of the broaching section on the broaching clamp is consistent. Try to pull the test piece. The test piece must also be thermostated before installation. The test piece must be wiped clean and securely clamped. The positioning end face of the positive test piece is perpendicular to the moving direction of the broach to avoid skewing, so as to cause false detection. Test piece inspection. It is generally detected by a coordinate measuring machine. When testing, the broaching benchmark and the benchmark must be consistent. The inspection items are divided into working surface linear dimension tolerance, arc dimension tolerance, surface roughness and the like. The transparency was evaluated by using a comprehensive sample to measure the transmittance. Only after the test piece has passed the test can the official product be broached. Broken products. The wheel blank positioning end surface and the broaching rotary table surface must be wiped clean, and there must be no bumps or scratches on both end faces. The end face of the positive wheel is not more than 0.03mm; the radial runout of the outer circle is not more than 0.03mm. It is best to use a torque wrench to tighten the bolt to compress the wheel on the broaching table. Care must be taken during the broaching process to monitor the working condition of the broaching machine. When the power of the broaching machine is too high, and the broaching machine vibrates or makes an abnormal sound, it is necessary to stop the broaching machine, check the broach and the broaching machine, and find out the cause before the broaching can be resumed. Metal processing online related news: grinding of gas turbine wheel groove broach
Brass knurled insert Made of brass material, good thermal conductivity and heat resistance.
Widely Used On the Molding for Tightly Fixing.
Can be installed by ultrasonic or heat into thread tapered hole, or molded in during injection
China Knurled Nut,Knurled Brass Insert Nut,Copper Knurled Insert Nut,Brass Knurled Insert Nut, we offered that you can trust. Welcome to do business with us.
Brass Knurled Nut,knurled thumb nut,knurled brass nut,Copper Knurled Nut,insert knurled nut Shenzhen Lanejoy Technology Co.,LTD , https://www.bbq-grillgrate.com
Han Jiang Tools Co., Ltd. He Feng 
Figure 1 (a) Compressor wheel groove groove type line (b) rotor turbine wheel wheel groove type line 
Figure 2 Rotor turbine wheel and broaching machine Lathe design

image 3 2. Use of broach